Showing posts with label cushion. Show all posts

Tuesday, April 23, 2019

Make a Custom Pillow Form, a tutorial

Just popping in to share how to reuse those old pillows to make a custom pillow form for a pretty new quilted pillow cover!

I seem to have needed a few of these lately and thought a simple tutorial might help someone else think to do the same!
1.  Starting with the old pillow, cut one end off and take the stuffing out.
2.  WASH and soak the pillow casing fabric in warm soapy, bleachy water! 
Rinse well, and dry...the casing is so lightweight you may usually just press it dry.
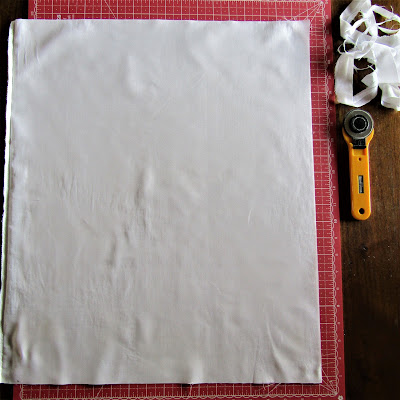
3.  Trim the other end off, and along one length, making the edges straight with your rotary cutter.
4.  If your pillow form is to be 18" or smaller, at this point, you would measure and cut to length.

But my pillow is larger than the my pillow casing, measuring 22" square, so I added a 4" strip to each end of my casing fabric, the strips cut from some casing fabric leftover from a different pillow and project.  To arrive at the 4" measurement, I simply measured the existing fabric(18" per side) and added the difference I needed(4") to each side, allowing for a 3/8" seam allowance.

5.  Beginning at the existing seam, sew, right-sides together, pivoting at the corners, and leaving a generous opening for turning and stuffing.  I suggest 5"-6" for the opening, shown in the picture by the 2 clips. Backstitch at each start and stop. I also recommend using a slightly larger seam allowance, say 3/8" or so.  
6.  Turn right side out. Using the stuffing from the pillow, take handfuls of the fill and pull apart repeatedly, to make it soft and loose, before filling your pillow, handful by handful.  If there are loose or empty-ish spaces, don't try to rearrange the stuffing to fill it, add handfuls where you need them, in the corners etc. When the pillow is filled to it's optimum, not too loose, not too full...
7.  Stitch the opening closedThis is the trickiest part for me, but I always manage to wrangle it closed with hand stitching. 
8.  Insert into your pretty quilted pillow cover, take pictures and admire liberally!
This is a fun pillow cover I started and finished without including on my Q2 Finish-A-Long list! I had long been itching to use 2 mini charm packs of "Saturday Morning" by Basic Grey, and I couldn't be more pleased with the colors and design!  I topped it off with some fun hand quilting detail in the plain squares.
 All of these except the smallest which is not a removeable cover, have home made, repurposed pillow forms in them!
As always, I hope these instructions were clear....please don't hesitate to ask if there is anything I can clarify for you!

Happy sewing!

Monday, August 13, 2018

Lady of the Lake Pillow

Number 6 on my Q3 Finish Along list!
Kind of a long shot, but I got 'er done!
Lady of the Lake pillow!
I used 2 Moda "candy packs" of True Blue, by Zen Chic, plus an Art Gallery print for the focal fabric in the four quadrants.
56 mini charms= 112 HSTs for this cushion that finished at 18"!
Using the "chained rows" or "web" method, I was able to piece the sections and keep it all in order as I assembled it!
It is quilted pretty heavily, using my walking foot as a guide to either side of the diagonal seams. 
I also decided to make this a 2-sided or reversible pillow by using a wonderful Coastline fabric, acquired recently from Needle and Foot!  I quilted this side with a simple 1 1/2" grid, on the diagonal.

I also added a zipper to this pillow cover, a new-to-me technique, following this recent tutorial on Suzy Quilts blog.

All in all, very pleased with how this turned out! It gets to live on my bed, not for general household use on the sofa!
Thanks for stopping by!
 I have several more fun finishes to share, so "stay tuned"!
(Wow! is that little saying obsolete these days?!)
Linking up with Beth and Main Crush Monday, over at Cooking Up Quilts

Tuesday, May 2, 2017

STRIPES!

It all started with this humorous FaceBook post by my husband's cousin, Nan, who wrote: "Please settle a debate. Chris wants to keep this shirt. I say Garth Brooks called and wants his shirt back! Keep or purge?"
                  
Naturally, I offered to cut it up and make him something...if that would help! The shirt arrived right before our cross country move in March. As it turned out, Chris liked the idea of a cushion for his camper!  I finally came up with a plan for it last week!
The Garth shirt, in all it's stripey glory!
I looked up images of quilts with stripes to see how clever folks had used stripes, and settled on something fun with Flying Geese. Let the cutting begin!
                                   
There wasn't much left for trimmings because I used the "wrong side" of the fabric for the solid.
                                             
I cut carefully, since my supply was limited. I made the geese one at a time, so all the stripes orient the same direction.
                                               
And, yes, I did get my "free" HSTs out of the deal! Which of course meant a bonus pillow!
                                                
The back sides were as pretty as the fronts!
Here is how the first pillow came out, after much layout play!
                                            
I really was "seeing stripes" after playing around with all these Flying Geese and HSTs.
It was a challenge for me to make any sense of them whatsoever, even after what I thought was careful cutting. But the irregular pieces from the shirt itself limited how "matchy" I could get with the cuts. I did what I could, and let it go at that...heck, they are for a camper, I told myself, not the centerpiece of the living room! Ha!
 There was not enough of the shirt to back the smaller pillow. The fabric is heavier and I didn't want to use quilting cottons for it, and was lucky enough to find this crazy heavyweight that my BIL had given me some time ago! The colors were close enough to warrant the use of it!
 The quilting on the HST pillow simply follows the seam lines...a favorite of mine, tried and true!
Straight lines on the Flying Geese seemed appropriate to me! 
The pair of Garth Camper Cushions have made their way back to Chris, who, I hear, highly approves!


I thought this project was a fun way to "get rid of the shirt, and keep it too"!
The larger cushion finished at 18", the smaller at 14" or so.
Thanks for stopping by for a look! Your visits and comments are always welcome and appreciated!

linking up with Lorna Let's Bee Social!


Monday, April 18, 2016

First Q2 Finish!

Barry Loves Sue Pillow! Number 4 on my Q2 list.
It went pretty quickly from this...
...to this!
My own personal welcome to the wonderful world of low volume :)
One of my sons suggested the fish camo for the B...as Barry is a fisherman, among other things, from Minnesota :)
I'm loving my two-toned pillow backs :)
So! There we go! One down, 2 or 3 to go :)
Linking up with Main Crush Monday @ Cooking Up Quilts :)


Friday, March 25, 2016

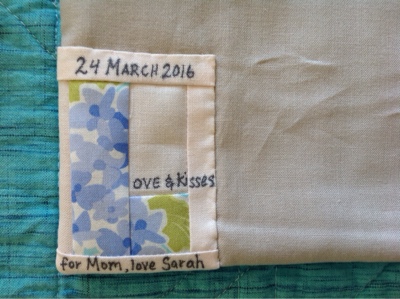
Love and Kisses!

My beautiful Mother celebrates her 80th birthday this week!
Without a plan for anything bigger, I came up with a smaller plan.
Juicy fruit colors and pale pastels....
vibrant (happy, lively, cheerful, adventurous), 
and soft (quiet, thoughtful, composed, loving), like her!
I improvised a little 3" (finished) x block....
Oops!  The L disappeared!
Ahh, that's better!
Straight line machine quilting with every pale color I had,
Hand stitching in the main panel with doubled thread for visibility.
6"x14", to fit a feather neck roll form I found online at Bed, Bath and Beyond...
I hope it is nice :)
The first L reappears on the back...more pastel...
A speedy little finish, but it is packed full of love!
Happy LXXXth Birthday to Mom!


Linking with:
Finish It Up Friday @ Crazy Mom Quilts :)
Main Crush Monday @ Cooking Up Quilts
Let's Bee Social @ Sew Fresh Quilts